What is Power? Power is earned by a player for the training of troops, constructing buildings, and upgrading those buildings in their City and Outposts. Power is also earned by completing quests.
This is a guide on how to efficiently gain power.
Theoretically, you should be able to look at a person's power and determine how strong that player's army is. However, some people build masses of beginner troops in order to appear stronger than they really are. This is called "fake power" or "fluff" in DoA terminology. Power doesn't mean anything if a large percentage of your troops are low grade soldiers.
If you lose troops during battles, you will lose the amount of power that you gained from that troop. Although, if your entire army is destroyed, you will not end up with 0 power because your buildings and completed quests also contribute a certain amount of power as well.
Power from Troops
Power per troop
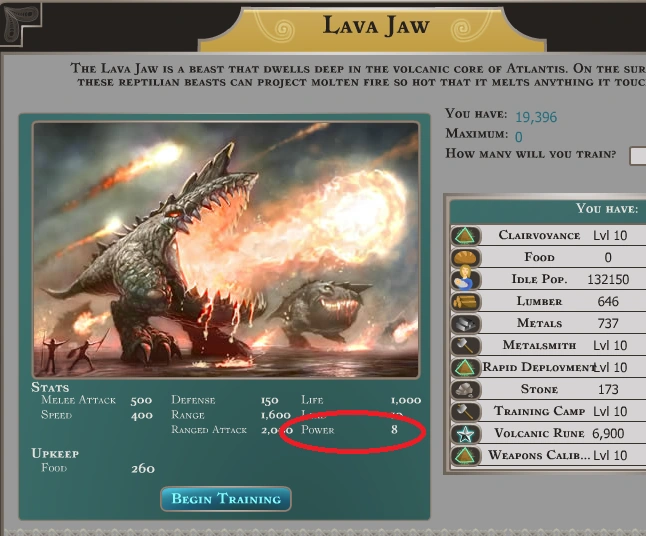
Every type of troop has a Power Grade listed on their Stat Chart in the Training Menu. This number is the total amount of power a single soldier will give you upon completion of its training.
To determine how much power you have from troops, look at how many of each troop type you have and multiply by the power listed on the training menu. See circled value in picture on the right.
Any power not accounted for by troops in this calulation would be power accumulated from Buildings and Quests.
Elite troops can only be trained once you get your training camp in it's specific Outpost to level 10. (Ex. Water Outpost + Training Camp Lv. 10 = Fangtooths)
Power Per Troop
| Troop Type | Power Per Troop | 100,000 Troops | 1mil Troops |
| Potter | 1 | 100,000 | 1,000,000 |
| Conscript | 1 | 100,000 | 1,000,000 |
| Spy | 2 | 200,000 | 2,000,000 |
| Halberdsman | 2 | 200,000 | 2,000,000 |
| Minotaur | 3 | 300,000 | 3,000,000 |
| Longbowman | 4 | 400,000 | 4,000,000 |
| Swift Strike Dragon | 5 | 500,000 | 5,000,000 |
| Battle Dragon | 7 | 700,000 | 7,000,000 |
| Armored Transport | 6 | 600,000 | 6,000,000 |
| Giant | 9 | 900,000 | 9,000,000 |
| Fire Mirror | 10 | 1,000,000 | 10,000,000 |
| Pack Dragon | 6 | 600,000 | 6,000,000 |
| Lighting Cannon | 10 | 1,000,000 | 10,000,000 |
| Fangtooth | 10 | 1,000,000 | 10,000,000 |
| Granite Ogre | 9 | 900,000 | 9,000,000 |
| Lava Jaw | 8 | 800,000 | 8,000,000 |
| Banshee | 6 | 600,000 | 6,000,000 |
| Venge Wyrm | 10 | 1,000,000 | 10,000,000 |
| Soul Reaper | 10 | 1,000,000 | 10,000,000 |
| Frost Giant | 8 | 800,000 | 8,000,000 |
| Venom Dweller | 9 | 900,000 | 9,000,000 |
| Petrified Titan | 20 | 2,000,000 | 20,000,000 |
| Sand Strider | 10 | 1,000,000 | 10,000,000 |
| Dark Slayer | 10 | 1,000,000 | 10,000,000 |
| Storm Drake | 10 | 1,000,000 | 10,000,000 |
| Dimensional Ruiner | 35 | 3,500,000 | 35,000,000 |
| Arctic Leviathan | 15 | 1,500,000 | 15,000,000 |
| 20 | 2,000,000 | 20,000,000 | |
| Thunder Golem | 40 | 4,000,000 | 40,000,000 |
| Shadow Stalker | 50 | 5,000,000 | 50,000,000 |
| Volt Ranger | 75 | 7,500,000 | 75,000,000 |
| War Scarab | 75 | 7,500,000 | 75,000,000 |
| Shaman | 50 | 5,000,000 | 50,000,000 |
| Dragon Riders | 80 | 8,000,000 | 80,000,000 |
| Colossal Mite | 85 | 8,500,000 | 85,000,000 |
| Abyssal Ravager | 100 | 10,000,000 | 100,000,000 |
Power from City Buildings
Each level per Building that you upgrade adds a certain amount of power. If you have a level 10 building, the total power you have recieved from that building is the power of that level + all the previous levels OR that level's power x 2. This applies to all levels, the power is cumulative. For example: power for level 1 + level 2 + level 3 = power for a level 4 building.
Abbreviations
| Fort = Fortress | OQ = Officer's Quarters | Gar = Garrison |
| Keep = Dragon's Keep | Rook = Rookery | TC = Training Camp |
| SC = Science Center | MS = Metalsmith | Mill = Lumbermill |
| Sent = Sentinel | Fact = Factory | |
| MP = Muster Point | Vault = Storage Vault |
In the Main City
| Level | Fort | Keep | Wall | SC | Sent | MP | OQ | Rook | MS | Fact | Vault | Theater | Home | Gar |
| 1 | 100 | 100 | 100 | 30 | 20 | 30 | 30 | 20 | 20 | 20 | 20 | 30 | 10 | 10 |
| 2 | 100 | 100 | 100 | 30 | 20 | 30 | 30 | 20 | 20 | 20 | 20 | 30 | 10 | 10 |
| 3 | 100 | 100 | 100 | 60 | 40 | 60 | 60 | 40 | 40 | 40 | 40 | 60 | 20 | 20 |
| 4 | 200 | 200 | 200 | 120 | 80 | 120 | 120 | 80 | 80 | 80 | 80 | 120 | 40 | 40 |
| 5 | 400 | 400 | 400 | 240 | 160 | 240 | 240 | 160 | 160 | 160 | 160 | 240 | 80 | 80 |
| 6 | 800 | 800 | 800 | 480 | 320 | 480 | 480 | 320 | 320 | 320 | 320 | 480 | 160 | 160 |
| 7 | 1600 | 1600 | 1600 | 960 | 640 | 960 | 960 | 640 | 640 | 640 | 640 | 960 | 320 | 320 |
| 8 | 3200 | 3200 | 3200 | 1920 | 1280 | 1920 | 1920 | 1280 | 1280 | 1280 | 1280 | 1920 | 640 | 640 |
| 9 | 6400 | 6400 | 6400 | 3840 | 2560 | 3840 | 3840 | 2560 | 2560 | 2560 | 2560 | 3840 | 1280 | 1280 |
| 10 | 12800 | 12800 | 12800 | 7680 | 5120 | 7680 | 7680 | 5120 | 5120 | 5120 | 5120 | 7680 | 2560 | 2560 |
| 11 | 25600 | 25600 | 25600 | 15360 |
10240 |
15360 | 15360 | --- | --- | --- | 10240 | --- | 5120 | 5120 |
| 12 | --- | 51200 | 51200 | 30720 |
--- |
30720 | 30720 | --- | --- | --- | 20480 | --- | 10240 | 10240 |
| 13 | --- | 102400 | 102400 | 61440 | --- | 61440 | 61440 | --- | --- | --- | 40960 | --- | 20480 | 20480 |
| 14 | --- | 204800 | 204800 | 122880 | 163840 | 122880 | 122880 | --- | --- | --- | 81920 | --- | 40960 | 40960 |
| 15 | --- | --- | 409600 | 245760 | --- | 245760 | 245760 | --- | --- | --- | 245700 | --- | 81920 | 81920 |
| 16 | --- | --- | 819200 | --- | --- | 983040 | --- | --- | --- | --- | 245700 | --- | 163840 | --- |
| 17 | --- | --- | --- | --- | --- | 1966080 | --- | --- | --- | --- | --- | --- | 327680 | --- |
| 18 | --- | --- | --- | --- | --- | 3932160 | --- | --- | --- | --- | --- | --- | --- | --- |
| 19 | --- | --- | --- | --- | --- | 7864320 | --- | --- | --- | --- | --- | --- | --- | |
| 20 | --- | --- | --- | --- | --- | 15728640 | --- | --- | --- | --- | --- |
In the Field
| Level | Farm | Mine | Mill | Quarry |
| 1 | 4 | 4 | 4 | 4 |
| 2 | 4 | 4 | 4 | 4 |
| 3 | 8 | 8 | 8 | 8 |
| 4 | 16 | 16 | 16 | 16 |
| 5 | 32 | 32 | 32 | 32 |
| 6 | 64 | 64 | 64 | 64 |
| 7 | 128 | 128 | 128 | 128 |
| 8 | 256 | 256 | 256 | 256 |
| 9 | 512 | 512 | 512 | 512 |
| 10 | 1,024 | 1,024 | 1,024 | 1,024 |
Outpost City & Field
| Level | Keep | MP | Wall | TC | Home | Silo | Farm | Mill | Mine | Quarry |
| 1 | 100 | 100 | 100 | 10 | 10 | 10 | 4 | 4 | 4 | 4 |
| 2 | 100 | 100 | 100 | 10 | 10 | 10 | 8 | 8 | 8 | 8 |
| 3 | 100 | 100 | 100 | 20 | 20 | 20 | 8 | 8 | 8 | 8 |
| 4 | 200 | 200 | 200 | 40 | 40 | 10 | 16 | 16 | 16 | 16 |
| 5 | 400 | 400 | 400 | 80 | 80 | 40 | 32 | 32 | 32 | 32 |
| 6 | 800 | 800 | 800 | 160 | 160 | 80 | 64 | 64 | 64 | 64 |
| 7 | 1600 | 1600 | 1600 | 320 | 320 | 160 | 128 | 128 | 128 | 128 |
| 8 | 3200 | 3,200 | 3,200 | 640 | 640 | 320 | 256 | 256 | 256 | 256 |
| 9 | 6,400 | 6,400 | 6,400 | 1,280 | 1,280 | 640 | 512 | 512 | 512 | 512 |
| 10 |
12,800 |
12,800 | 20400 | 2,560 | 2,560 | 1,280 | 1,024 | 1,024 | 1,024 |
1,024 |
| 11 | 25,600 | 25,600 | 40800 | 5,120 | 5,120 | 2,560 | 2,048 | 2,048 | 2,048 | 2,048 |
| 12 | 51,200 | 10,240 | ||||||||
| 13 | 102,400 | 20,480 | ||||||||
| 14 | 204,800 | 40,960 | ||||||||
| 15 | 409,600 | 81,920 | ||||||||
| 16 | 1000000 | 819,200 | 163,840 |
Spectral Ruins
| Level | Altar | Dark Portal | Mausoleum | Reaping Stone |
| 1 | 50 | 250 | 10 | 4 |
| 2 | 50 | 500 | 10 | 4 |
| 3 | 100 | 1000 | 20 | 8 |
| 4 | 200 | 2000 | 40 | 16 |
| 5 | 400 | 4000 | 80 | 32 |
| 6 | 800 | 8000 | 160 | 64 |
| 7 | 1,600 | 16000 | 320 | 128 |
| 8 | 3,200 | 32000 | 640 | 256 |
| 9 | 6,400 | 64000 | 1,280 | 512 |
| 10 | 12,800 | 2,560 | 2,560 | 1,024 |
Skythrone
| Level | Dragon's Keep | Library | Cathedral''' | Greenhouse | Forge | Academy | |
| 2 | 50 | 10 | 10 | 4 | 4 | 4 | |
| 3 | 100 | 20 | 20 | 4 | 8 | 4 | |
| 4 | 200 | 40 | 40 | 16 | |||
| 5 | 400 | 80 | 80 | 32 | |||
| 6 | 800 | 160 | 160 | 64 | |||
| 7 | 1,600 | 320 | 320 | 128 | |||
| 8 | 3,200 | 640 | 640 | 256 | |||
| 9 | 6,400 | 1,280 | 1,280 | 512 | |||
| 10 | 12,800 | 2,560 | 2,560 | 1,024 |
Steelshard Caverns
| Level | Dragon's Keep | Training Camp | Library | Cathedral | Greenhouse | Depot | Forge | Academy | Depot |
| 1 | --- | --- | --- | --- | --- | --- | --- | 50 | |
| 2 | --- | --- | --- | --- | --- | --- | --- | 50 | --- |
| 3 | --- | --- | --- | --- | --- | --- | --- | 100 | --- |
| 4 | --- | --- | --- | --- | --- | --- | --- | 200 | --- |
| 5 | --- | --- | --- | --- | --- | --- | --- | 400 | --- |
| 6 | --- | --- | --- | --- | --- | --- | --- | --- | --- |
| 7 | --- | --- | --- | --- | --- | --- | --- | --- | --- |
| 8 | --- | --- | --- | --- | --- | --- | --- | --- | --- |
| 9 | --- | --- | --- | --- | --- | --- | --- | --- | --- |
| 10 | --- | --- | --- | --- | --- | --- | 6,800,000 | --- | --- |
Quests
| Quest | Requirements for Completion | Power |
| Serpent's Sting | Send an attack with your Mephitic Serpent | 2,000 |
| Offering to Darkness | Summon a Wraith Dragon | 50,000 |
| Might of the Shadows | Win a Battle with the Wraith Dragon | 10,000 |
| Power of the Dragon's Frost | Send an Attack with a Frost Dragon | 2,000 |
| Train a Water Dragon | Level 8 Water Dragon with All Armor | 5,000 |
| Find a Stone Dragon Egg | Acquire the Stone Dragon Egg | 2,000 |
| Start a 2nd Outpost | Build a 2nd Outpost | 2,000 |
| Train a Stone Dragon | Level 8 Stone Dragon with All Armor | 10,000 |
| Complete the SD Armor Set | Collect all 4 pieces of Stone Dragon Armor | 2,000 |
| Reinforce Outposts | Build 5 level 9 TCs in OP 2 | 1,000 |
| Find a Fire Dragon Egg | Acquire the Fire Dragon Egg | 2,000 |
| Build a 3rd Outpost | Build a 3rd Outpost | 35,000 |
| Complete the FD Armor Set | Collect all 4 pieces of Fire Dragon Armor | 2,000 |
| The Wind Dragon | Acquire the Wind Dragon Egg | 2,000 |
| The Outpost of Wind | Build the Wind Outpost | 35,000 |
| Arm Your Wind Dragon | Collect all 4 pieces of Wind Dragon Armor | 2,000 |
| Prepare a Wind Dragon for Battle | Level 8 Wind Dragon with All Armor | 10,000 |
| Elemental Dragon Lord | Level 8 Water, Stone, Fire, & Wind Dragons | 40,000 |
| Dark Lord | Build a Spectral Ruin | 10,000 |
| Find a Frost Dragon Egg | Acquire Frost Dragon Egg | 2,000 |
| The Outpost of Frost | Build the Frost Outpost | 35,000 |
| Great Dragon Attack | Send an Attack that involves the Great Dragon | 500 |
| Improve Officers' Quarters | Upgrade the Officers' Quarters to Level 11 | 1,000 |
| The Dark Arts II | Research Guardian Research | 10,000 |
| Start Farming | Build a Level 1 Farm | 10 |
| Start Logging | Build a Level 1 Lumbermill | 10 |
| Start Mining | Build a Level 1 Mine | 10 |
| Start Quarrying | Build a Level 1 Quarry | 10 |
| Increase Quarrying | Build 3 Quarries | 10 |
| Grow Population | Get a Population of 250 | 10 |
| Grow Population | Get a Population of 500 | 20 |
| Grow Population | Get a Population of 1000 | 100 |
| Grow Population | Get a Population of 5000 |
| 15,625 --- 19,532 | |
| 6 | 31,250 --- 39,062 |
| 7 | 62,500 --- 78,125 |
| 8 | 125,000 --- 156,250 |
| 9 | 250,000 --- 312,500 |
| 10 | 500,000 --- 625,000 |
Total power gain for upgrading one of the 1st two battle arts from 0 to 10 is 1,000,000. Total power gain for upgrading the 3rd battle art from 0 to 10 is 1,250,000. You must activate the dragon's familiar before you can begin upgrading the 3rd battle art.
No power is awarded for unlocking familiars.
==
 |
| Page last updated: 2024-04-19 11:14 (UTC) |
|---|
==
Power Builds
Typically there are 2 types of builds a player can choose from. The first being a classic * TC heavy build mostly used by non ruby players and the second being a Population heavy build used mostly by ruby players. As the game has changed more players have adapted to the Population heavy build to help assist them in tourney rankings .
Population Heavy
Description
The population heavy build is exactly what it sounds like. It’s the build style that allows you to gain more population for training. This style focuses on buildings homes and limiting the number of garrisons/training camps. The purpose of this build style is to better prepare you for Kabam competitions and battle.
How’s that? Simple. The more troops you can make at once, the more power you gain from one queue, which means fewer queues which saves valuable speeds (yay!). This also means you’ll have more troops on hand for battle which goes directly toward your growth as a player and the purpose of the game.
Ruby Package Required:-Optional.
Stage 1 of Build
The first step in this build is in your city. We recommend only building one garrison as training times in city are slow and level 16 and 17 homes in city give a nice little march boost. Build one of each required building, one garrison and fill the rest of the spots with homes. Level the garrison up to 7 for LBM and spies and when you have time, get it up to 8 or 9 so the training times won’t be abysmal at the beginning. In general, don’t worry about slow training times as that’s what Testronius items (especially infusions) are for and you’ll almost never train in your city anyway once you have your OPs.
Having more homes gives more population which allows you to make more troops at once. The effect of this is two-fold. First, it allows you to grow at a faster rate (power-wise and troops-wise). Although the troops take longer to train, it’ll pay off in the end when you have all the troops you need for various tasks in the game (i.e. enough Longbowman (LBM) to wave for eggs and armour and enough Lava Jaws (LJ’s) to hit a level 11 camp when your research is up to snuff). Second, more troops in one queue means more power per queue which means fewer queues which saves speeds when doing power challenges and bracketed tournaments.
If you’re in a good alliance with some high powered players then resources won’t be a problem and you should just build one of each field building for research purposes. If you’re going at it alone, the task is tougher at the beginning so you may want to build a storage vault and perhaps a few farms in your field to help curb the food production (not too many though since they take away from your population). You can always null them later when you have plenty of food and a decent level of rationing. Also when you get to an advanced stage of the game, you can always farm level 11 camps to get a large amount of food quickly.
Homes build pretty quickly compared to other buildings so levelling them up shouldn’t take that long and for this build, getting all homes to level 9 is the highest priority once everything is in place. This way you can get maximum population for queuing troops to stimulate growth. The required buildings are the same as in the classic build with storage vault and theatre being optional.
Stage 2 of Build
Many experienced players say don’t build a theatre because you can keep your tax rate at zero and have all your population and then spike it to 50% when troops are queued up. That works pretty well but there is an advantage to having a theatre. It allows you to keep a steady tax rate of 20% to generate gold while retaining all of your population. Gold is a very important resource and is essential for training the “untrainable troops” so having a steady gold income can prove advantageous in that situation. The more you generate, the less you have to hunt down gold glitches for. Of course doing this is completely optional but it has its advantages.
Stage 3 of Build
Setup for your outposts is generally the same as city with some variation to account for the different functions of the different Outposts. There are 27 spots in your outpost with 1 muster point and 1 silo. The silo holds resources that you produce in your Outposts. Since we advise you not to build resource sites in your Main city, you will not need any silos in your Ops. We recommend using a Mass Nullifier on your silos and your Muster Point in all Outposts. This will give you 29 slots to build on. Since this is about having maximum population, we will focus primarily on having mostly homes in your outposts with a few exceptions.
Water OP
Fangtooth’s are one of the first elite troops you can build with lower level research. They are an excellent troop in combat and they train relatively fast so we recommend only putting 6-8 Training Camps in this outpost and making the rest homes.
Stone OP
Granite Ogres are one of the most important troops in the game and since you’ll need large numbers of them and they take a while to train, we recommend putting 8-10 Training Camps in this OP and leaving the rest of the spots for homes.
Fire OP
Lava Jaws are the MOST IMPORTANT elite troop in the game, especially at the beginner stage. Like fangtooth’s, they train fairly quickly but since a large number of them is necessary for fast growth, we recommend putting 10-12 TC’s in the Fire OP. Don’t go overboard on TC’s here because this is still a population heavy build.
Wind OP
Banshees are a great speed troop for farming camps and pretty useful in combat because of their high speed. They take a while to train but they’re not very good power builders so we recommend keeping the TC’s down to the same number you put in your Water OP (i.e. 6-8). Tip for power building: Battle Dragons are an excellent troop for power building and combat. They may seem slower than Banshees on the surface but Dragonry research makes them slightly faster. They’re nice for absorbing damage and they’re 7 power for 6 pop which is better than the 6-6 ratio of Banshees.
Ice OP
Frost Giants are by far the best elite power builder in the game and they’re very handy to have around for walling and Soul Reapers are extremely important for growth as they allow you to revive large amounts of troops in your Spectral Ruins. For this reason, we recommend putting 10-12 TC’s in this OP to help curb the long training times that frostiest and reapers have.
Sunken Temple OP
Venom Dwellers are an underrated troop in combat and more importantly, they’re the second best elite power builder in the game. They do take a while to train but they’re not as important as Lava Jaws (LJ’s), Frost Giants (FG’s) and Soul Reapers (SR’s) so 6-8 TC’s in here should be good enough.
Gaea Spring OP
Petrified Titans are extremely useful to have around for walling but they’re slower than molasses to train and having more TC’s doesn’t change that. They take 30 minutes per Titan to train and there’s nothing you can do about it. They also require gold and Blue Energy to train as well as 14 pop so training them isn’t practical. They’re very easy to clone in large numbers so we recommend only putting one TC in here and filling the rest of the spots with homes to further increase your population.
Solarian Highlands OP
Sand Striders are pretty useful to have around but they take Blue Energy and Anthropus Talismans to train so it’s easier just to clone them. Homes in the Solarian Highlands give 1.5x idle pop so this should be the primary place to build homes. As with Gaea, we recommend only putting one TC in Solarian to give you the maximum population for training troops.
Cliffs of Chronos OP
Remember in the beginning when we said not to worry about slow training times? Well here’s why. Since drops on elite items from camps are too low to sustain training them for challenges and tournaments, most of what you train for power contests is what most players call “fluff”. Basically this means Conscripts, Spies, Halberdsmen, and Minotaur’s. Many players include Swift Strike Dragons and Battle Dragons in that list but if they consider those troops “fluff”, they are mistaken. Both are immensely useful in combat and pretty good power builders for when you get tired of making tons of Minos. This OP is also where you train the “untrainable troops” because it’s faster than training them in your city. Therefore, we recommend filling all 29 spots in this OP with Training Camps. This helps make up for the slow training times in other Outposts and expedites training for power contests since this is where you will train most of your troops for those contests.
Spectral Ruins
The last outpost that needs attention is the Spectral Ruins. Since training times will be slow for elites in this build, you will want to revive large batches of elites on a regular basis. To accomplish this, you will need a large amount of storage space in the form of Mausoleums. We recommend building 15 Mausoleums and 10 Dark Portals for a good balance between revival time and storage space. Note that Mausoleums are like homes in that they don’t take that long to upgrade while Dark Portals take a significant amount of time to upgrade, especially at the higher levels.
Stage 4 of Build
Once you’ve laid the foundation for this build as outlined above, the goals should be to focus on getting homes upgraded and research going. How convenient that you can do both at the same time. Since homes and low level research don’t take very long, it’s best to do that when you’re online and save the upgrades that take a while for when you’re going to be offline for a while. Levitation research decreases build time which proves useful for the upgrade fury that happens once everything’s been built. There’s also a Levitation boost in Sanctuary that can be used to augment the research boost and can be obtained through breeding.